It is a known fact that the PlayStation 3 is one of the best-selling consoles of all time. Despite having sold over 84 million units worldwide, it remains Sony’s least-sold console. However, its successor, PlayStation 4, sold more units on its release day than any other console.
To fix DNS Error 80710102, Try Disabling the Universal Plug & Play Setting, Reset Your Router, Try Changing The Mode Of Connection, or Manually Configure The Default DNS Address.
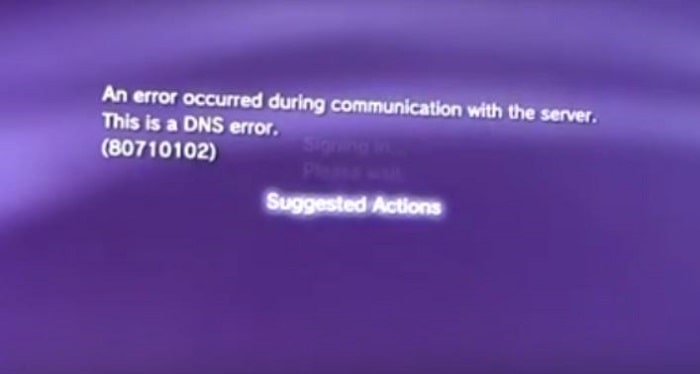
You must have encountered at least a few errors if you are an avid gamer, amateur, or expert gamer. I mean, you would be lying if you said you didn’t! You might be playing your favorite game, and everything will go well, and BOOM! An error appears saying, ‘An error has occurred during connection with the server. This is a DNS error 80710102’. And that would seriously frustrate any gamer!
See also: How To Get Good Internet Speed For Gaming [Guide]
Contents
But What Is A DNS Error?
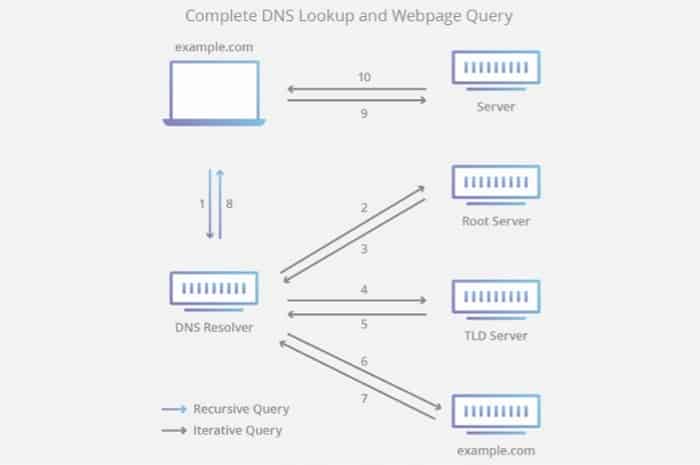
DNS, or Domain Name System, was a service implemented to convert the web domain name to an IP address or vice versa. For example, if you type in any site’s name on your search engine without a DNS, the search engine wouldn’t work, as the servers would not understand where to take you.
But what could go wrong with it when it all seems so easy? Well, most probably because the router isn’t granting your PS3 access to connectivity by denying the IP address request. Although, you should never forget that this happens in wireless and not wired connections. This is because the wired router automatically configures the settings.
If you frequently use the PS3 console for gaming, you’ll see that DNS Error 80710102 occurs often. As discussed above, an error occurs due to issues in the connection between your console and the router. But do not worry! Here are four ways to eliminate this DNS error without any hassle! Do as it is said in the solutions to alleviate your PlayStation of the DNS 80710102 Error in a matter of minutes!
See also: Login To Virgin Router | Complete Guide
Method 1: Try Disabling the Universal Plug & Play Setting
Go through the directions mentioned below to turn off plug-n-play
- First and foremost, open up the web browser of your preference. Then, produce your router’s IP address in the URL bar. The predominantly used default IP for most servers is 192.168.1.1. Make sure you have entered the correct digits in the right place.
- Now, you will view a user login box on your web browser. Here, you must produce your router’s valid user ID and passcode.
- After gaining access to your router’s user interface, you must look up ‘password’ on your web browser. Click on it and then try finding UPnP below the router’s password settings.
- Now, disable UPnP in the box and remember to save the settings without fail.
- At last, cancel the console and restart your PlayStation 3.
This should have solved the connection problem. If it does not, move on to the following method.
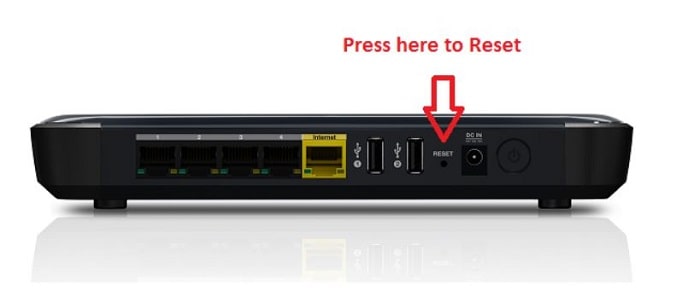
Method 2: Reset Your Router
Go through the directions mentioned to reset your router:
- The first step is to track down a tiny hole at the rear of your router(which is the reset button).
2. After you do so, find a slender tool that will go through that hole. The tool can be a safety pin, but be careful while handling it.
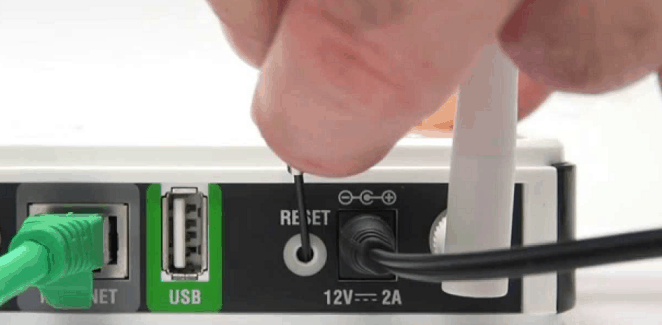 3. Then, jab the tool into the hole and hold for thirty seconds.

Then, your router will power off for some moments and will power on by itself. Now, your router has been reset. This is a straightforward method to fix the error, as it might mend any underlying router issue.
See also: 192.168.1.99 Admin Login, Username And Password
Method 3: Manually Configure The Default DNS Address
The DNS given below has been confirmed to rectify the DNS 80710102 Error many times. Read and perform the steps as discussed to make the error go away!
- Open the settings of your PlayStation.
- Now, select the setting given at the end of Network Settings.
- Next, select the Internet Connection subheading and press ’OK.’
- After doing that, select the Custom mode of setting.
- Now, you must select between the modes in which your PS3 is connected to the router—wired if it is associated with the help of cables or wireless if connected over LAN.
- If you choose wired, configure the connection unless you reach the IP settings. Else, set it to ‘Auto-Detect.’
Now, alter the settings as instructed below:
- First of all, set the IP Address as Automatic
- Then, under DHCP Hostname, choose Do Not Set
- Now, opt for Manual under the DNS Settings
- Now, produce the numbers given below:
- Primary DNS: 129.250.35.250
- Secondary DNS: 129.250.35.251
- Now, set MTU to Automatic
- Select Do Not Use under Proxy Server
- In the end, Enable the UPnP.
In the end, verify the connection to see if the problem persists.
See also: DHCP lookup failed Error – How to solve it?
Method 4: Try Changing The Mode Of Connection
As a last resort, connect the PS3 differently. It is generally a widespread belief that connecting the PlayStation over LAN is not very helpful. And that the PlayStation frequently gets disconnected from the WiFi. Interestingly, some gamers have claimed the opposite happens to them.
This is because there might be a loose or inoperative connection between the PlayStation 3 and the router. Hence, it is better to thoroughly check the cables between them and ensure they are appropriately connected. Once you do that, power up your PlayStation again to check if it still shows DNS Error 80710102.
See also: Wireless PAN DHCP server – All you need to know
FAQS
What is the DNS error on PS3?
When attempting to connect to the Internet, the PlayStation 3 gives the DNS Error 80710102 message. The issue is well-known to PlayStation users. Turning off the universal plug-and-play on the router is the solution. The console interface on the router is used to turn off global plug-and-play.
How to fix the DNS connection error?
Use a different browser or device and go nearer to your internet router. Restarting your devices, adjusting your DNS settings, and clearing your DNS cache are additional options. If the issues still exist, update your network drivers and disable your firewall and VPN.
Is it safe to reset DNS?
Resetting your DNS is secure. Some users hesitate when clearing the DNS cache or think doing so too frequently may have negative consequences. It might be because some operating systems need administrator authorization or higher privileges to do so.
How can I utilize a proxy server on a PS3?
From the PS3 console's main menu, click Settings and then Network Settings. Select your current network connection now, and then fully click the right button till you see Proxy Server. Finally, to use it, click the X button.
Can hackers alter DNS?
Yes. Hackers can use Malware to access your router's administration page. Once entered, they can modify the DNS configurations to force the router to utilize a server under their control. Hence, simply visit your router's admin page and look at the DNS settings to check for this assault.
Conclusion To The DNS Error 80710102:
All of these methods are more than enough to make the error disappear. All of these methods were tailored to make you quickly and efficiently understand the solutions. Read all the steps carefully from top to bottom before implementing any of these solutions. Happy Gaming!
See also: Netgear Router Red Light Issue – Reasons & Solutions | (100% FIX)
You can always find me with a cup of coffee Googling anything and everything related to the networking. Refer to our detailed How-To Guides on wifi routers and never face any issue with router again!