We all know what a router is and how important it is. After the outbreak of the pandemic, the Router has become a necessity. Without a router, living an easy life is next to impossible. The internet has become the bread and butter of one’s life now. So here we bring you our complete guide on Asus router port forwarding.
One of the widely used routers is the Asus router. This is one of the few routers that perform well. Also, the price is extremely reasonable. It performs way better than the average routers available in the market.
If you are an Asus router user, this article will help you. This guide is going to facilitate you to make Router porting simpler. Just relax and read this article with total concentration to know more.
See also: Everything about the Asus Router Login
Port Forwarding
There are certain situations where you might require Asus router port forwarding. Now you might ask what port forwarding is. Well, talking in layman’s terms, this process permits outsourced devices to access your private computer network. This method involves something called mapping. The external device will be mapped on the internal IP address to port it. 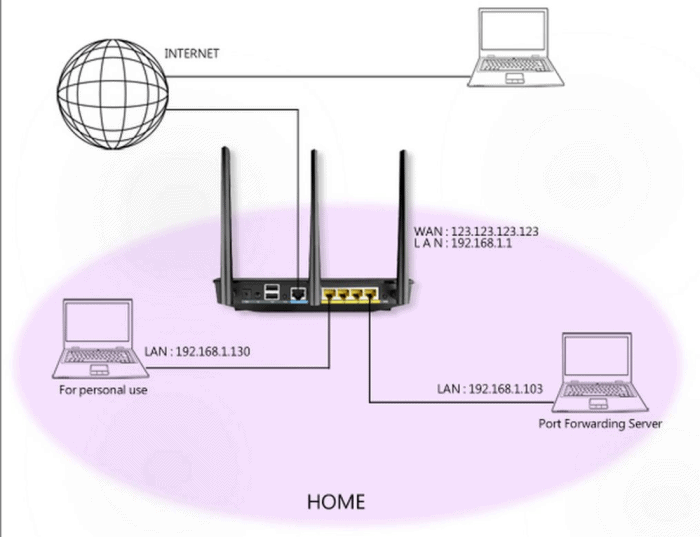
If you are a gamer, you know exactly what is happening here. Generally, gaming applications might ask you to do a port forwarding source target.
This source-target port forwarding technique is a fantastic way to protect your private network. It tends to preserve private networks. So basically, if you want to secure your network, this is the best way to do so! This is done by keeping unwanted and unsafe traffic off the networks.
Port forwarding can be done using your home router. It does not require any exorbitantly priced product. A simple router will also do.
To conduct port forwarding, you need to know the external IP address of the Router that needs to be forwarded. Also, the Port number needs to be known.
This is a little complicated when you go into the technicalities. So, let us leave it at the basics.
See Also: How to Find Default Router Gateway in Mac, Windows, Android & Chrome
Asus Port Forwarding
You now have basic knowledge about what port forwarding means. Let us return to the main issue – Asus router port forwarding.
This is pretty simple if you follow the steps prescribed. Note that you must refrain from skipping any steps. If you do so, you will have to start the process again.
- You should port forward the Asus router by first logging into the Asus router. This should be done using the default gateway address. If you are unaware, this is the address: http://router.asus.com.

- After you do this, look for the option with the heading Advanced Settings. As soon as you locate this, search for the WAN title.
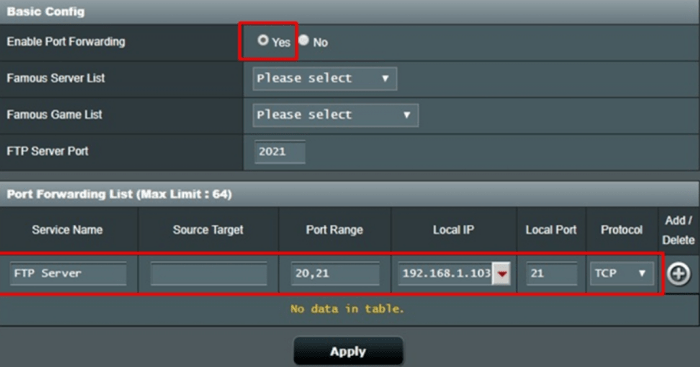
- Select the Port Forwarding or the Virtual Server option when you find this. You might find only one of the options. After you find this, you must choose the option ‘Yes.’ If you struggle to find this, look for the ‘Enable Port Forwarding’ option. Immediately after you click ‘Yes,’ you need to enter the Service Name, Port Rang, and Local IP. Now set the Protocol to ‘Both.’
- In the last step of the Asus router port forwarding procedure, you need to click ‘Add/Delete.’ Then you need to ‘Apply’ so that the changes are reflected.
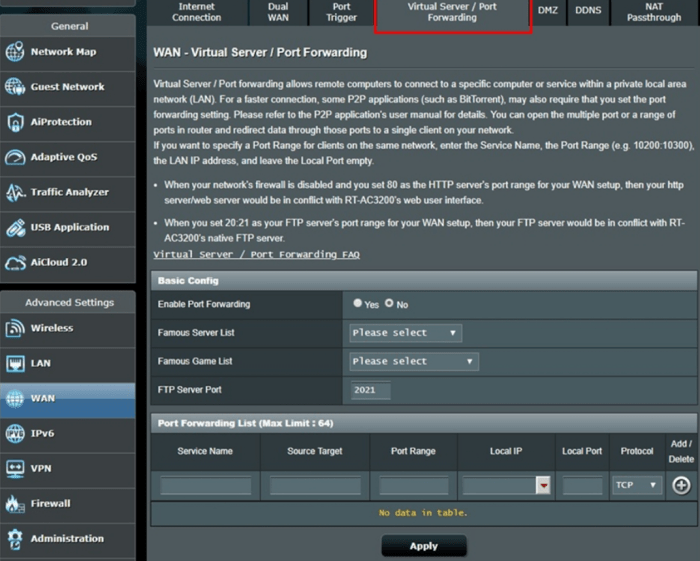
The above is for an FTP server.
- You can also use another method. You need first to select HTTP in the ‘Famous Server List.’ You will then need to enter a range for the HTTP server. After this, you need to select the local IP Address.

- After you are done, click ‘Edit,’ and you can ‘Apply’ the changes.
This one is for an HTTP server. For Asus router port forwarding, you should stick to FTP.
Read more: Everything About Netgear Router Login
Source Port Forwarding Procedure
If you want to do an Asus port forwarding target, you need to keep the source IP needs to be left blank. This means that the source is unspecific. You could also enter a specific IP address, such as 192.168.86.1. It could be any. This is just for the sake of an example. One more method you can do is that you can use an IP address that falls in the same pool. This is also an easy way.
For the Asus router, you can do it using the following procedure:
- First, ensure your FTP server is running correctly and set up. You will then require a desktop to check this. Do make sure that your desktop is connected to the internet. Remember that you do not have to connect this desktop to the Asus router.
- Now, open the desktop using the Router’s WAN address. Access the FTP server with an FTP application browser.
- In case you can access the files of the server, congrats! Your port forwarding procedure has been successful!
Know More: Everything About Arris Router Login
FAQs
How does a router's port forwarding function?
Using port forwarding, you can set up public services like web servers, FTP servers, email servers, and other specialized Internet programs on your network. So, the router will route these requests to the proper machine when users send this request to your network over the Internet.
What happens from port-forwarding data on 443?
You choose Camera A as the destination for all port 443 communication from your router's external IP address. Then, all incoming data on port 443 is sent by your router to Camera A on your network, allowing you to use it when you're away from home.
What is UPnP in the router?
A network protocol called Universal Plug and Play (UPnP) enables devices that comply with it to self-configure port forwarding rules. These gadgets, including personal computers, printers, security cameras, game consoles, and mobile devices, can share data via your network and connect.
Is DMZ better than port forwarding?
Yes. The DMZ is the most straightforward approach to safely port forward outside your network without compromising your data. However, it is a protected area outside your network. Hence, three things a DMZ network does for port forwarding are enabling access control, preventing network infiltration, and blocking IP spoofing.
Does port forwarding cause Internet sluggishness?
No. Port forwarding will not impact your internet speed—most routers block all incoming internet requests by default. So, you can set an exception and allow requests on a particular port. Hence, it lets those requests inside your network and directs them to a specific device on the LAN via port forwarding.
What is the disadvantage of port forwarding?
By default, port forwarding increases access to your computer for users outside of your network. Accessing or using unsafe ports can be dangerous since it allows threat actors. Also, other individuals with malicious intentions can take complete control of your device quickly.
Conclusion
You have finally understood the procedure for Asus router port forwarding. You can now port your Router in a hassle-free way. Just remember one golden rule – follow the steps. Do not skip any step. You must first read the guide thoroughly to understand the procedure properly. Then, you can follow the steps slowly so that no mistakes are made.
See Also: How to login and configure your 192.168.1.20 Router
You can always find me with a cup of coffee Googling anything and everything related to the networking. Refer to our detailed How-To Guides on wifi routers and never face any issue with router again!